Saturday, 29 September 2012

Unobtrusive Validation with ASP.NET 4.5 Web Forms


ASP.NET 4.5 has a nice set of new features. One of them is unobtrusive validation.

If you view the source of a rendered ASP.NET web forms application page having some validation controls in it, you might have seen a bunch of JavaScript loaded on the page. Following is the script generated by a RequiredFieldValidator on a TextBox with id txtName:

var ctl02 = document.all ? document.all["ctl02"] : document.getElementById("ctl02");
ctl02.controltovalidate = "txtName";
ctl02.errormessage = "Name is required";
ctl02.evaluationfunction = "RequiredFieldValidatorEvaluateIsValid";
ctl02.initialvalue = "";

You will find the similar type of code repeated for each validator placed on the page. If you are familiar with unobtrusive validation with ASP.NET MVC, you must be quite unhappy with the amount of code generated by the validation controls. The new unobtrusive validation feature of ASP.NET 4.5 addresses this.


Unobtrusive validation at the application level:

In Web.config of an ASP.NET 4.5 web forms application, you will find the following entry under app settings:
<add key="ValidationSettings:UnobtrusiveValidationMode" value="WebForms" />

It enables unobtrusive validation across the application. If you view the source of a page rendered on browser, you won’t find script for validation on the page. Instead, three script tags similar to the following tags could be found on the page:
<script src="/WebResource.axd?d=pynGkmcFUV13He1Qd6_TZLv7DjRaFqg0yRBfnvODdAS94A_OOBwhy8nY7JMj1NbACkb_ZyVf5fipIP42cocX1Q2&t=634714073180000000" type="text/javascript"/>
<script src="/Scripts/jquery-1.6.2.js" type="text/javascript"/>
<script src="/WebResource.axd?d=x2nkrMJGXkMELz33nwnakL2OZ4HP8bsjSngrcd8UroKEEVhaEuVC5g5pe51DNkLFL7DehRRQHMYPIuJvCi0WQsVaECZ-CsAU-OcJY4vtyF41&t=634714073180000000" type="text/javascript"/>

Scripts referred by first and third tags are generated dynamically when the application runs. These scripts would be generated only when unobtrusive validation is enabled. These scripts are shared across all the pages that contain validation controls.

The second WebResource.axd script referred contains JavaScript functions for all the validators and the code to invoke those functions. Source on the page rendered contains some span tags that are generated because of the validation controls. It is totally free of script corresponding to the validation controls.

If you don’t want to use unobtrusive validation on all pages, you may disable it from web.config by changing the value of application setting to None as shown below:
<add key="ValidationSettings:UnobtrusiveValidationMode" value="None" />

At the page level:

At page level, unobtrusive validation can be enabled by setting value to the page variable UnobtrusiveValidationMode to WebForms as shown below:
protected void Page_Load(object sender, EventArgs e)
{
     UnobtrusiveValidationMode = System.Web.UI.UnobtrusiveValidationMode.WebForms;
}

Similarly, if unobtrusive validation is enabled at the application level, we can use the following script to disable it on a page:
protected void Page_Load(object sender, EventArgs e)
{
     UnobtrusiveValidationMode = System.Web.UI.UnobtrusiveValidationMode.None;
}

When to use?

In my opinion, unobtrusive validation should be used when the web application consists of many forms and if the forms are associated with some ASP.NET validation controls. If we have just one or two forms in the application with very less amount of validation done in those pages, then it is better to disable the unobtrusive validation. This is because, there is no point of making the validation script reusable in such small applications.

Happy coding!

Tuesday, 25 September 2012

Populating date obtained from server on a web page depending on capability of browser

 With the increasing use of JavaScript client libraries and advanced capabilities of browsers, a lot of logic is put on the client side. Dates are always there to bug the developers. Most of the times, we struggle with displaying a date value on the screen or getting the value from the page and sending it back to server.

I recently struggled with displaying a date value on browser. The issue was because of the following reasons:

  • Format of the date
  • Support of HTML5 datetime field

The datetime field is currently supported only by the Opera browser. On other browsers, I wanted to use jQuery UI’s datetime picker widget.
I have the following input element on my form:

<input type="datetime" id="currentDate" />

On unsupported browsers, this field appears as a textbox. Using the JavaScript library Modernizr, we can find if a feature is supported on a browser. The following script checks if datetime field is supported. If it is not supported, it adds the datetime picker widget to the field:
if(!Modernizr.inputtypes.datetime){
     currentDate.datepicker();
}

 The default format of date in .NET is MM-dd-yyyy hh:mm:ss (e.g. 07-25-2012 00:00:00). Format of the date used by Opera’s datetime field is: yyyy-dd-MMThh:mm:ssZ. This conversion is not very easy if we use JavaScript’s Date data type. DateJS library makes this conversion very easy.
var parsedDate=Date.parse("07-25-2012 00:00:00");
var currentDate = $("#currentDate");
currentDate.val(parsedDate.toJSONString());

The function toJSONString() used in the above snippet returns date in yyyy-dd-MMThh:mm:ssZ format.

Default date format used by the datepicker widget is MM/dd/yyyy. Following script sets the value of date in this format to the datepicker.
currentDate.datepicker();
currentDate.val((parsedDate.getMonth()+1)+"/"+parsedDate.getDate()+"/"+parsedDate.getFullYear());
Following is the consolidated script:
$(function(){
    var parsedDate=Date.parse("07-25-2012 00:00:00");
    var currentDate = $("#currentDate");
    currentDate.val(parsedDate.toJSONString());
		
    if(!Modernizr.inputtypes.datetime){
        currentDate.datepicker();
        currentDate.val((parsedDate.getMonth()+1)+"/"+parsedDate.getDate()+"/"+parsedDate.getFullYear());			
    }
});


Happy coding!

Wednesday, 12 September 2012

An Introduction to testing with the Model-View-Presenter pattern for Web Forms Development: Article on Developer Fusion


 I am excited to announce that my article on An Introduction to testing with the Model-View-Presenter pattern for Web Forms Development is published on Developer Fusion

The article covers the following:
  • The reasons why a Web Forms application is less testable
  • Needs of an enterprise application
  • Importance of separation of concerns
  • Difference between MVP and MVC
  • Splitting functional logic of a page across several independent units
  • Using Repository pattern to create the Model
  • Test driving the process of creating presenters
  • Writing fake classes to pass the unit tests


Hope you will enjoy reading the article as much as I did while writing it :).

Happy coding!

Master Detail View using ASP.NET 4.5 Model Binding


ASP.NET 4.5 includes a set of great new features. One of them is the Model Binding.

 With the new model binding feature, we can bind data to ASP.NET controls in a type safe way. Older versions of ASP.NET also had binding features, but the properties used to be resolved at the run time. For example, if we use Bind(‘’) or Eval(‘’), we won’t get to know if we made a mistake in typing name of the property until run time. There are a number of chances to get an exception when the page is loaded on a browser.

 Let’s see the model binding feature in action. Open Visual Studio 2012 and create a new ASP.NET web application project by choosing File -> New -> Project and select ASP.NET Web Forms Application template. Name the project and hit OK.

Right click on the project and select Add -> New Item, choose ADO.NET Entity Data Model, name it Northwind.edmx. From the Choose Model Contents dialog, select Generate from database, configure the connection string to point to the Northwind database. From choose table dialog, choose Customers table and click on Finish.

Add a new Web Form to the application. Drag and drop a GridView and a DetailsView on the page. In the code behind, add a method GetCustomers with the following logic.
public IQueryable<Customer> GetCustomers()
{
       NorthwindEntities _Context = new NorthwindEntities();
       var customers = _Context.Customers;
       return customers;
}

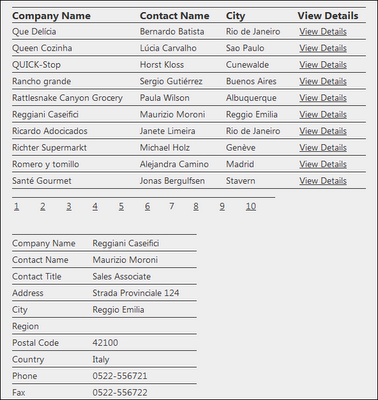
Let’s bind the data returned by this method to the GridView. Let’s configure the grid view to display three columns (CompanyName, ContactName and City). We will have a select field on the GridView. On click of which, details of the customer will be displayed in a DetailsView. To use model binding to display data on any control, type of data has to be set using the new ItemType attribute. Each record to be shown on GridView’s row is of Customer type. This has to be assigned to ItemType property. Markup of the GridView is as follows:
<asp:GridView runat="server" AutoGenerateColumns="false" ID="gvCustomers" 
SelectMethod="GetCustomers" ItemType="AspNetModelBinding.Customer"   DataKeyNames="CustomerID"
        AllowPaging="true" PageSize="10">
        <Columns>
            <asp:TemplateField HeaderText="Company Name">
                <ItemTemplate>
                    <%#: Item.CompanyName %>
                </ItemTemplate>
            </asp:TemplateField>
            <asp:TemplateField HeaderText="Contact Name">
                <ItemTemplate>
                    <%#: Item.ContactName %>
                </ItemTemplate>
            </asp:TemplateField>
            <asp:TemplateField HeaderText="City">
                <ItemTemplate>
                    <%#: Item.City %>
                </ItemTemplate>
            </asp:TemplateField>

            <asp:CommandField ShowSelectButton="True" SelectText="View Details" ShowHeader="True" HeaderText="View Details"></asp:CommandField>
        </Columns>
    </asp:GridView>
Please notice the way in which data is bound to the template fields. If you are following along, do not copy the markup from here, type it on your VS 2012 IDE. In the data binding statements, you will get intellisense. This is because, the type of data being bound to the control is known at the compile time. The method fetching data for the GridView is assigned to the SelectMethod property.

I used paging in the GridView as the number of records in the customers table is more than 80.

Let’s define the method to fetch data to be displayed on the DetailsView. This method will take ID of the customer selected from the GridView. We can define this dependency using the Control attribute with the ID of the GridView passed as an argument to it as shown below:
public Customer GetCustomerDetails([Control("gvCustomers")]string customerID)
{
       NorthwindEntities _Context = new NorthwindEntities();       
       var customer = _Context.Customers.First();
       if (customerID != null)
       {
              customer = _Context.Customers.Single(c => c.CustomerID == customerID);
       }
       return customer;
}

 If you have a value in Cookie and you wish to pass it as argument to the method, it can be done using the Cookie attribute in the same way. Let’s bind all properties of customer to the DetailsView using template fields. Markup of the DetailsView is as follows: 
<asp:DetailsView ID="dvCustomers" runat="server" ItemType="AspNetModelBinding.Customer"
         AutoGenerateRows="False" SelectMethod="GetCustomerDetails">
        <Fields>
            <asp:TemplateField HeaderText="Company Name">
                <ItemTemplate>
                    <%#: Item.CompanyName %>
                </ItemTemplate>
            </asp:TemplateField>
            <asp:TemplateField HeaderText="Contact Name">
                <ItemTemplate>
                    <%#: Item.ContactName %>
                </ItemTemplate>
            </asp:TemplateField>
            <asp:TemplateField HeaderText="Contact Title">
                <ItemTemplate>
                    <%#: Item.ContactTitle %>
                </ItemTemplate>
            </asp:TemplateField>
            <asp:TemplateField HeaderText="Address">
                <ItemTemplate>
                    <%#: Item.Address %>
                </ItemTemplate>
            </asp:TemplateField>
            <asp:TemplateField HeaderText="City">
                <ItemTemplate>
                    <%#: Item.City %>
                </ItemTemplate>
            </asp:TemplateField>
            <asp:TemplateField HeaderText="Region">
                <ItemTemplate>
                    <%#: Item.Region %>
                </ItemTemplate>
            </asp:TemplateField>
            <asp:TemplateField HeaderText="Postal Code">
                <ItemTemplate>
                    <%#: Item.PostalCode %>
                </ItemTemplate>
            </asp:TemplateField>
            <asp:TemplateField HeaderText="Country">
                <ItemTemplate>
                    <%#: Item.Country %>
                </ItemTemplate>
            </asp:TemplateField>
            <asp:TemplateField HeaderText="Phone">
                <ItemTemplate>
                    <%#: Item.Phone %>
                </ItemTemplate>
            </asp:TemplateField>
            <asp:TemplateField HeaderText="Fax">
                <ItemTemplate>
                    <%#: Item.Fax %>
                </ItemTemplate>
            </asp:TemplateField>
        </Fields>
    </asp:DetailsView>

The way data is bound to both of the controls is quite similar. We set the SelectMethod, ItemType properties and bound each field as a template field. This makes these controls strongly typed. Instead of resolving the properties and types at the run time, we resolved them at the compile time. This reduces the chances of getting runtime exceptions because of type mismatch of spelling mistakes.

Open the page on a browser and play with it.


Update: Code of this sample can be downloaded from here

Happy coding!

Sunday, 9 September 2012

Injecting dependencies into SignalR hub using Ninject

Hub is the key component for SignalR on the server. We put the key functional logic in the hub class. So, it is very much possible that we will have to access database or files on the server from the hub class. This dependency may make the hub less testable.

To avoid such difficulties, we will have to implement Dependency Inversion Principle. The hub has to contain an abstract reference of the dependency. An object of the concrete implementation of the abstract type will be injected into the hub using an Inversion of Control (IoC) container. This makes the hub less dependent on the concrete implementation, hence testable in isolation. Inversion of Control is a huge topic to discuss. If you are new to IoC, read this nice post by Joel Abrahamsson. If you have a subscription to Pluralsight, watch the course on Inversion of Control by John Sonmez.

In .NET, we inject the dependencies into a class using a library known as Inversion of Control container or IoC container. There are several implementations of IoC containers. Some of them are: 

  • Ninject
  • Unity
  • Structure Map
  • Castle Windsor
  • MEF

Usage of the IoC containers differs from each other. Before using any of these libraries, we have to learn and understand the syntax using which we configure the types and the way in which we have to resolve them.

SignalR has a dependency resolver class (SignalR.DefaultDependencyResolver). This class is used by the SignalR library to resolve all the dependencies. You may check the source code on GitHub to know what this class does. To inject the dependencies in our application, we have to write a class that derives from the DefaultDependencyResolver class. We have to override the GetService and GetServices methods. The logic in these methods is responsible to accept the abstract type and return an object of the concrete implementation.


For example, say the hub class talks to a database. In enterprise applications, we use the Repository Pattern to perform database operations. Say ICustomerRepository is a repository interface and CustomerRepository is the concrete implementation of this interface.
public interface ICustomerRepository
{
 void AddCustomer(Customer customer);
 void ModifyCustomer(Customer customer);
 IEnumerable<Customer> GetCustomersByDepartment(string departmentId);
}
public class CustomerRepository : ICustomerRepository
{
 //concrete implementations of the methods
} 

Following snippet shows an incomplete implementation of a Hub using the above repository:
public class CustmerHub : Hub
{
 ICustomerRepository repository;
 public CustmerHub(ICustomerRepository repository)
 {
  this.repository = repository;
 }
 …
}

An object of CustomerRepository type has to be injected into the CustomerHub from an external agent. Add the NuGet package for Ninject to the application.


Now we need to create our own dependency resolver by extending DefaultDependencyResolver. Following is the implementation for Ninject:
public class NinjectDependencyResolver:DefaultDependencyResolver
{
    private readonly IKernel _kernel;
 
    public NinjectDependencyResolver(IKernel kernel)
    {
        if (kernel == null)
        {
            throw new ArgumentNullException("kernel");
        }
 
        _kernel = kernel;
    }
 
    public override object GetService(Type serviceType)
    {
        var service = _kernel.TryGet(serviceType) ?? base.GetService(serviceType);
        return service;
    }
 
    public override IEnumerable<object> GetServices(Type serviceType)
    {
        var services = _kernel.GetAll(serviceType).Concat(base.GetServices(serviceType));
        return services;
    }
}

We have to configure requested types and target types so that Ninject will be able to return the right objects when they are requested. Following class does this for us:
public static class NinjectIoC
{
    public static IKernel Initialize()
    {
        IKernel kernel = new StandardKernel();
        kernel.Bind<ICustomerRepository>().To<CustomerRepository>();
        kernel.Bind<RequestedType>().To<TargeTtype>();
        return kernel;
    }
}

Finally, we need to set the resolver to RouteTable.Route.MapHubs when the application starts.
public class Global : System.Web.HttpApplication
{
    void Application_Start(object sender, EventArgs e)
    {
        // Code that runs on application startup
        GlobalHost.DependencyResolver = new NinjectDependencyResolver(NinjectIoC.Initialize());
        RouteTable.Routes.MapHubs();
    }
}

With this step, we have set the dependency resolver to SignalR. Whenever it needs to resolve a dependency, the control will be passed to NinjectDependencyResolver to create the object.

Important note: If you are using SignalR in an ASP.NET MVC project, then configure SignalR first and then ASP.NET MVC. Check SignalR wiki for more details.

Happy coding!

Wednesday, 5 September 2012

SignalR hub communication without using proxy and cross-domain communication

In my previous posts on SignalR, I was using the auto generated proxy script /signalr/hubs to connect and communicate with the server. Doing so, we are asking the client browser to download an additional script. If the hub consists of a number of methods or if there are multiple hubs defined on the server side, the script file will be bulky. Also, it is may not be possible to compress and minify the script file as it is generated dynamically. In this post, we will discuss about communication with hub without using the proxy script file.


The following listing shows connecting, creating proxy, calling a server function and handling callback.

Establishing connection with the server:
var connection = $.hubConnection();

Creating a proxy object of the Hub class on the server:
var proxy = connection.createHubProxy(‘hub-name’)

Starting the hub:
connection.start();

Invoking a server function:
proxy.invoke(‘function-name’);

Handling callback:
proxy.on(‘callback-name’,function(arg1, arg2, …){
 //function body
});

In my previous post, I created a small market application that modifies and displays prices of gold and silver. Let’s add another client page to that application. In this page, we will communicate with server without using the proxy script.

If you haven’t downloaded the code yet, download it now and run it on your PC.

Add a new HTML page to this application. Copy the references of script files (except the reference of /signalr/hubs script) and the mark-up inside the body tag from the GoldSilverPrices.html page into this page.


Handle jQuery’s ready event and initialize the variables and objects as shown:

$(function(){
var up = '▲';
var down = '▼';
var goldPriceSpan = $("#goldPrice");
var silverPriceSpan = $("#silverPrice");
var goldPriceHtml;
var silverPriceHtml;
var gsPrices = new Array();

gsPrices[0] = 0;
gsPrices[1] = 0;
});

Establish connection to the hub:
var connection = $.hubConnection();

Create the proxy object:
var proxy = connection.createHubProxy('priceHub');

Start the connection and invoke the getPrices function once the connection starts:
connection.start().done(function () {
 proxy.invoke('getPrices');
});

Handle the callback function using proxy.on:
proxy.on("populatePrices", function (prices) {
    if (gsPrices[0] != 0 && gsPrices[1] != 0) {
        if (gsPrices[0] < prices[0]) {
            goldPriceHtml = prices[0] + " " + up;
            goldPriceSpan.css("color", "green");
        }
        else if (gsPrices[0] > prices[0]) {
            goldPriceHtml = prices[0] + " " + down;
            goldPriceSpan.css("color", "red");
        }

        if (gsPrices[1] < prices[1]) {
            silverPriceHtml = prices[1] + " " + up;
            silverPriceSpan.css("color", "green");
        }
        else if (gsPrices[1] > prices[1]) {
            silverPriceHtml = prices[1] + " " + down;
            silverPriceSpan.css("color", "red");
        }
    }
    else {
        goldPriceHtml = prices[0];
        silverPriceHtml = prices[1];
    }

    goldPriceSpan.html(goldPriceHtml);
    silverPriceSpan.html(silverPriceHtml);
    gsPrices = prices;
    });
});

Open this page on the browser. This page should behave the same way as the other client page. We followed the same set of steps to create the client page. But, we used a different set of functions defined in the SignalR client script library to make the page functional.


Cross-domain communication

Now, let’s separate the client from the server. Create a new ASP.NET Empty application and add the NuGet package SignalR.Js to it. SignalR.Js consists of SignalR’s JavaScript client libraries alone, it doesn’t include the .NET assembly references.

Copy the client page created above to this project. Also, add the images which are used in the previous application. The only change to be made to this client page to make it work is passing URL while connecting to the hub:
var connection = $.hubConnection("http://localhost:port-no");

That’s it! View this page on the browser. Run the admin page and change the values. All clients should be in sync with the data modified on the admin page.


Happy coding!

Sunday, 2 September 2012

Modifying and Monitoring price of Gold and Silver using SignalR


In my first post, I showed you how to get started with SignalR by creating a simple Hello World type of application. In this post, we will create a simple market application using SignalR. The market deals with prices of gold and silver. We will have two HTML pages in this application. Out of which, one is an admin page; we can modify the prices using this page. The other page is a client page; which displays the current prices of gold and silver with an indicator that shows whether the price went up or down.

Setting up the environment

Start Visual Studio 2010 (or 2012) and choose File -> New -> Project. From the dialog, choose the Empty Web Application template. Make sure that the target version of the project is .NET framework 4 or later. Name the application and hit OK.

Add the dependencies of SignalR using NuGet. Right click on References in the Solution Explorer and choose Manage NuGet Packages or Add Library Package Reference, depending on the version of NuGet installed on your system. Search for SignalR and click on the install button.

Add a folder to the project and change its name to Images. Download an image of a gold biscuit and an image of a silver biscuit and add them to this folder. If you don't want to search, you may grab them from the source code (download link is provided at the end of this post). We will display these images on the pages.

Creating hub class

Add a class to the project and name it GSPriceHub (Gold and Silver price hub). Extend this class from Microsoft.AspNet.SignalR.Hub class, the base class to create an hub in SignalR.

A JavaScript proxy of this class will be created in the /signalr/hubs script that gets generated automatically. By default, name of the proxy object for GSPriceHub class will be gSPriceHub. But, we can change this name using the HubName attribute. I am renaming the hub as priceHub using this attribute as follows:

[HubName("priceHub")]
public class GSPriceHub : Hub
{
}

Implementation of the hub class is straight forward. The hub will have an array of length 2 to store the prices. It will have methods to send initial and modified values of the prices.

    [HubName("priceHub")]
    public class GSPriceHub : Hub
    {
        double[] prices = new double[2];

        public void InitializePrices()
        {
            prices[0] = 28596;
            prices[1] = 59365;
        }

        public void ModifyPrices(double[] modifiedPrices)
        {
            prices = modifiedPrices;
            Clients.All.PopulatePrices(prices);
        }

        public void GetPrices()
        {
            InitializePrices();
            Clients.All.PopulatePrices(prices);
        }
    }

We need to define the PopulatePrices method on the client. Admin page will call the ModifyPrices method. Let's indicate the admin once the execution of ModifyPrices method finishes. We can do this using the property Caller defined in the Hub class. We need to add another statement to the ModifyPrices method to call a client script defined in the admin page. The modified method is as follows:

        public void ModifyPrices(double[] modifiedPrices)
        {
            prices = modifiedPrices;
            Clients.All.PopulatePrices(prices);
            Clients.Caller.PricesModified();
        }

The Pricesmodified method has to be defined in the admin page.


Creating the Admin page
Add an HTML page to the application. Right click on the application and choose Add -> New Item and choose HTML page from the dialog. Add the following HTML markup to the body:

<strong style="font-size: x-large">Prices of Gold and Silver in India</strong> <br />
    <form>
    <table border="0" cellpadding="0" cellspacing="0">
        <tr>
            <td> Gold </td>
            <td> &nbsp; </td>
            <td> <img src="Images/gold.jpg" alt="Gold" height="100" width="100" /> </td>
            <td> &nbsp; </td>
            <td> <input type="text" id="goldPrice" /> </td>
        </tr>
        <tr>  
            <td> &nbsp; </td>
            <td> &nbsp; </td>
            <td> &nbsp; </td>

            <td> &nbsp; </td>
        </tr>
        <tr>
            <td> Silver </td>
            <td> &nbsp; </td>
            <td> <img src="Images/silver.jpg" alt="Gold" height="100" width="100" /> </td>
            <td> &nbsp; </td>
            <td> <input type="text" id="silverPrice" /> </td>
        </tr>
    </table>
    <input type="button" id="modifyPrices" value="Modify Prices" />
    </form>

Add the references of jQuery core library, SignalR jQuery library and reference of the SignalR's dynamic script(/signalr/hubs) to this page. Let's make this page functional by adding some JavaScript. As first step, let's get the references of the input controls and the proxy object.

$(function () {
    var goldPriceTextBox = $("#goldPrice");
    var silverPriceTextBox = $("#silverPrice");
    var modifyPricesButton = $("#modifyPrices");
    var proxy = $.connection.priceHub;
}

Let's display initial prices of gold and silver on the page load. To do this, we need to invoke the GetPrices method defined in the hub class. We can invoke this method once we establish a connection to the hub, which we do by calling $.connection.hub.start() function. We cannot call the server methods unless the start function finished execution. I discussed about different ways to execute a callback function after execution of the start function in my previous post. Add the following code to call the GetPrices method after execution of the start function and display these values on the page:
$.connection.hub.start(function () {
    proxy.server.getPrices();
});

proxy.client.populatePrices = function (prices) {
    goldPriceTextBox.val(prices[0]);
    silverPriceTextBox.val(prices[1]);
};

When user changes the price values and clicks on the Modify Prices button, we have to call the ModifyPrices method defined in the hub. To make the change visible to the user, let's disable the button till the execution completes. Following script achieves this:

modifyPricesButton.click(function () {
    var goldPrice = goldPriceTextBox.val();
    var silverPrice = silverPriceTextBox.val();
    var modifiedPrices = new Array();

    modifiedPrices[0] = goldPrice;
    modifiedPrices[1] = silverPrice;

    modifyPricesButton.attr("disabled", "disabled");
    proxy.server.modifyPrices(modifiedPrices);
});

proxy.client.pricesModified = function () {
    window.setTimeout(function () {
    modifyPricesButton.removeAttr("disabled")
    }, 2000);
};

Execution of the hub function finishes very fast. It is almost impossible to view the state of button changing to disabled and back to enabled. To make it visible, I paused the execution for 2 seconds by calling the window.setTimeout function.


Creating the Client page
Add another HTML page to the application. The client page has a similar view as that of the admin. The only difference is, we have span fields instead of the text input fields. Following is the markup to be placed in the body of the client page:
<strong style="font-size: x-large">Prices of Gold and Silver in India</strong>
    <br />
    <table border="0" cellpadding="0" cellspacing="0">
        <tr>
            <td> Gold (per 10g) </td>
            <td> &nbsp; </td>
            <td> <img src="Images/gold.jpg" alt="Gold" height="100" width="100" /> </td>
            <td> &nbsp; </td>
            <td> <span id="goldPrice" /> </td>
        </tr>
        <tr>
            <td> &nbsp; </td>
            <td> &nbsp; </td>
            <td> &nbsp; </td>
            <td> &nbsp; </td>
        </tr>
        <tr>
            <td> Silver (per 1kg) </td>
            <td> &nbsp; </td>
            <td> <img src="Images/silver.jpg" alt="Gold" height="100" width="100" /> </td>
            <td> &nbsp; </td>
            <td> <span id="silverPrice" /> </td>
        </tr>
    </table>

Add the references of jQuery core library, SignalR jQuery library and reference of the SignalR's dynamic script(/signalr/hubs) to this page. Like always, we need to handle jQuery's ready event. On the page load, we will display the initial prices, just as we did it in the admin page. Following script initializes the required variables, objects and calls the getPrices function when the page loads:

$(function () {
    var proxy = $.connection.priceHub;
    var up = '▲';
    var down = '▼';
    var goldPriceSpan = $("#goldPrice");
    var silverPriceSpan = $("#silverPrice");
    var goldPriceHtml;
    var silverPriceHtml;
    var gsPrices = new Array();

    gsPrices[0] = 0;
    gsPrices[1] = 0;

    $.connection.hub.start(function () {
        proxy.server.getPrices();
    });
});

The populatePrices function is a bit heavier as we are changing the color of the span element based on value. Following is the implementation of the populatePrices function:


proxy.client.populatePrices = function (prices) {
    if (gsPrices[0] != 0 && gsPrices[1] != 0) {
        if (gsPrices[0] < prices[0]) {
            goldPriceHtml = prices[0] + " " + up;
            goldPriceSpan.css("color", "green");
        }
        else if (gsPrices[0] > prices[0]) {
            goldPriceHtml = prices[0] + " " + down;
            goldPriceSpan.css("color", "red");
        }

        if (gsPrices[1] < prices[1]) {
            silverPriceHtml = prices[1] + " " + up;
            silverPriceSpan.css("color", "green");
        }
        else if (gsPrices[1] > prices[1]) {
            silverPriceHtml = prices[1] + " " + down;
            silverPriceSpan.css("color", "red");
        }
    }
    else {
        goldPriceHtml = prices[0];
        silverPriceHtml = prices[1];
    }

    goldPriceSpan.html(goldPriceHtml);
    silverPriceSpan.html(silverPriceHtml);
    gsPrices = prices;
};

Save everything and open the admin page in a browser. Open the client page on another browser window. Once both the pages are loaded on browsers,  modify the values on the client page and see the magic in action!!!


Gold silver prices


Here we go. As soon as we change the values in the admin page, the value changes on the client page also. This shows the power of SignalR. SignalR helps a lot in such applications. We didn't worry about notifying the client when the value changes on the server at all. Implementation on client and server side were totally based on business. Rest of the things were managed by SignalR.

I apologize about the amount of code included in this post, but I couldn't help it. Hope you understand that :)


You can download the source code using this link: Download Source

Happy coding!