ASP.NET 4.5 includes a set of great new features. One of
them is the Model Binding.
With the new model binding feature, we can bind data to
ASP.NET controls in a type safe way. Older versions of ASP.NET also had binding
features, but the properties used to be resolved at the run time. For example,
if we use Bind(‘’) or Eval(‘’), we won’t get to know if we made a mistake in
typing name of the property until run time. There are a number of chances to
get an exception when the page is loaded on a browser.
Let’s see the model binding feature in action. Open Visual
Studio 2012 and create a new ASP.NET web application project by choosing File -> New -> Project and select
ASP.NET Web Forms Application
template. Name the project and hit OK.
Right click on the project and select Add -> New Item, choose ADO .NET
Entity Data Model, name it Northwind.edmx.
From the Choose Model Contents dialog, select Generate from database, configure
the connection string to point to the Northwind
database. From choose table dialog, choose Customers
table and click on Finish.
Add a new Web
Form to the application. Drag and drop a GridView and a DetailsView on
the page. In the code behind, add a method GetCustomers with the following
logic.
public IQueryable<Customer> GetCustomers()
{
       NorthwindEntities _Context = new NorthwindEntities();
       var customers = _Context.Customers;
       return customers;
}
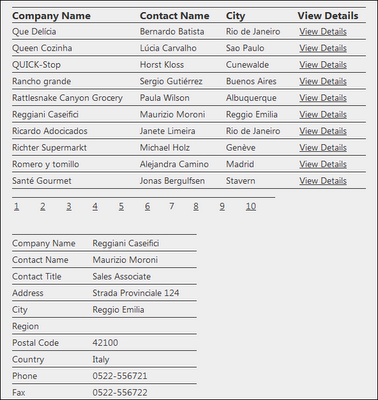
Let’s bind the data returned by this method to the GridView. Let’s configure the grid view to display three columns (CompanyName, ContactName and City). We will have a select field on the GridView. On click of which, details of the customer will be displayed in a DetailsView. To use model binding to display data on any control, type of data has to be set using the new ItemType attribute. Each record to be shown on GridView’s row is of Customer type. This has to be assigned to ItemType property. Markup of the GridView is as follows:
<asp:GridView runat="server" AutoGenerateColumns="false" ID="gvCustomers"
SelectMethod="GetCustomers" ItemType="AspNetModelBinding.Customer"   DataKeyNames="CustomerID"
        AllowPaging="true" PageSize="10">
        <Columns>
            <asp:TemplateField HeaderText="Company Name">
                <ItemTemplate>
                    <%#: Item.CompanyName %>
                </ItemTemplate>
            </asp:TemplateField>
            <asp:TemplateField HeaderText="Contact Name">
                <ItemTemplate>
                    <%#: Item.ContactName %>
                </ItemTemplate>
            </asp:TemplateField>
            <asp:TemplateField HeaderText="City">
                <ItemTemplate>
                    <%#: Item.City %>
                </ItemTemplate>
            </asp:TemplateField>

            <asp:CommandField ShowSelectButton="True" SelectText="View Details" ShowHeader="True" HeaderText="View Details"></asp:CommandField>
        </Columns>
    </asp:GridView>
I used paging in the GridView as the number of records in the customers table is more than 80.
Let’s define the method to fetch data to be displayed on the
DetailsView. This method will take ID of the customer selected from the
GridView. We can define this dependency using the Control attribute with the
ID of the GridView passed as an argument to it as shown below:
public Customer GetCustomerDetails([Control("gvCustomers")]string customerID)
{
       NorthwindEntities _Context = new NorthwindEntities();
       var customer = _Context.Customers.First();
       if (customerID != null)
       {
              customer = _Context.Customers.Single(c => c.CustomerID == customerID);
       }
       return customer;
}
If you have a value in Cookie and you wish to pass it as argument to the method, it can be done using the Cookie attribute in the same way. Let’s bind all properties of customer to the DetailsView using template fields. Markup of the DetailsView is as follows:
<asp:DetailsView ID="dvCustomers" runat="server" ItemType="AspNetModelBinding.Customer"
         AutoGenerateRows="False" SelectMethod="GetCustomerDetails">
        <Fields>
            <asp:TemplateField HeaderText="Company Name">
                <ItemTemplate>
                    <%#: Item.CompanyName %>
                </ItemTemplate>
            </asp:TemplateField>
            <asp:TemplateField HeaderText="Contact Name">
                <ItemTemplate>
                    <%#: Item.ContactName %>
                </ItemTemplate>
            </asp:TemplateField>
            <asp:TemplateField HeaderText="Contact Title">
                <ItemTemplate>
                    <%#: Item.ContactTitle %>
                </ItemTemplate>
            </asp:TemplateField>
            <asp:TemplateField HeaderText="Address">
                <ItemTemplate>
                    <%#: Item.Address %>
                </ItemTemplate>
            </asp:TemplateField>
            <asp:TemplateField HeaderText="City">
                <ItemTemplate>
                    <%#: Item.City %>
                </ItemTemplate>
            </asp:TemplateField>
            <asp:TemplateField HeaderText="Region">
                <ItemTemplate>
                    <%#: Item.Region %>
                </ItemTemplate>
            </asp:TemplateField>
            <asp:TemplateField HeaderText="Postal Code">
                <ItemTemplate>
                    <%#: Item.PostalCode %>
                </ItemTemplate>
            </asp:TemplateField>
            <asp:TemplateField HeaderText="Country">
                <ItemTemplate>
                    <%#: Item.Country %>
                </ItemTemplate>
            </asp:TemplateField>
            <asp:TemplateField HeaderText="Phone">
                <ItemTemplate>
                    <%#: Item.Phone %>
                </ItemTemplate>
            </asp:TemplateField>
            <asp:TemplateField HeaderText="Fax">
                <ItemTemplate>
                    <%#: Item.Fax %>
                </ItemTemplate>
            </asp:TemplateField>
        </Fields>
    </asp:DetailsView>
The way data is bound to both of the controls is quite similar. We set the SelectMethod, ItemType properties and bound each field as a template field. This makes these controls strongly typed. Instead of resolving the properties and types at the run time, we resolved them at the compile time. This reduces the chances of getting runtime exceptions because of type mismatch of spelling mistakes.
Open the page on a browser and play with it.
Update: Code of this sample can be downloaded from here
Happy coding!

This comment has been removed by the author.
ReplyDeleteCan I get the source as ZIP file ?
Deletethanks
Sanjaya,
DeleteI added a link to download the code