Some of you might have surprised to see the title containing Node, Express and Visual Studio together. Yes, it is possible to build Node.js applications on Visual Studio. In case, if you don’t know Visual Studio also has an extension for developing Python applications, you need to install the PTVS (Python Tools for Visual Studio) to be able to do it. The team that developed on PTVS also developed NTVS (Node.js Tools for Visual Studio) with help from a couple of community folks. NTVS is open source right from the beginning and accepts community contributions. The project is still in beta, so it has some pain points, but still it works pretty well. To follow along with this post, download and install the extension from its codeplex site. It works with the 2012 and 2013 versions of Visual Studio.
After installing NTVS, fire up Visual Studio and choose File -> New -> Project. In the dialog, expand Other Languages, and the node JavaScript under that. You will see a new option Node.js added here. Under this, you will find a number of project templates to start developing Node.js applications.
If you have TypeScript installed, you will find the same set of templates under TypeScript node as well.
Let us start building a simple Todo list application using NTVS. From the new project dialog, select Blank Express Application, change name of the application to Express-Todo and hit OK.
The new project we just created has all the set up ready for developing a Node – Express application. The project has the following NPM packages installed; you can find them under the npm node in Solution Explorer.

Express is a light weight server framework to develop Node.js applications. Jade is the most popular view engine used with express to compose the pages. Stylus defines a way to write CSS, takes many pain points of writing CSS away.
The app.js file generated with the project template has a number of middle-wares invoked for us to set up the node application.
Now run the application. You should be able to see a simple hello World kind of view in the browser.
We need another NPM package, underscore.js. It can be installed in two ways. One is using the dialog offered by NTVS or using npm command on the command prompt. Let us use the GUI dialog to install the package. Right click on the NPM node and choose “Manage npm Modules…”. Go to the tab “Search npm Repository” and type underscore. Choose the package highlighted in the screenshot and hit Install Locally. This step adds the package to the project and adds an entry of underscore to package.json as well.
Check the contents under npm node, you should be able to see the package underscore there.
Add a new JavaScript file to the folder routes and name it todos.js. This file will contain the API service to display and add todo items against an in-memory collection. Following is the code in the file:
I used underscore to calculate the next ID of the todo item. To use underscore, we need to add the require declaration at the beginning of the file, it is similar to the using statements in C# code files. All members to be exposed to the outside world have to be added to the exports object.
In order to expose the above methods as APIs, we need to define the HTTP method and attach a route path to them. In the app.js file add the following statement at the top:
This statement brings the module object exposed by the todos.js file. Now all we need to do is define routes, they are done as follows:
That’s pretty easy, isn’t it? With this, we are done with the work on the server side. Let’s define the components on the client side. As first thing, let’s add jQuery to the layout page. You can install the package using bower and use it or you can point to a CDN as well. Let’s use Google’s CDN path to refer jQuery. Following is the jade tag that does this:
Now, let’s update the index.jade file to contain the list items. Following is the mark-up of the modified index.jade file:
As you see, in jade, one doesn’t require angle brackets to define the tags. It understands nesting through indentation. For indenting the tags, one can use either spaces or tabs; but not both. We are yet to define the todoOperations.js file referred above. Let’s do it now. Add a JavaScript file to the javascripts folder under public folder and name it todoOperations.js. Code in this file is pretty straight forward, if you know jQuery.
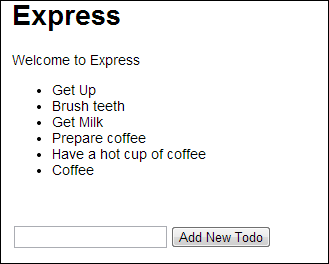
Now run the application. You will be able to see the list of todo items populated on the page and you will also be able to add new todo items.
After installing NTVS, fire up Visual Studio and choose File -> New -> Project. In the dialog, expand Other Languages, and the node JavaScript under that. You will see a new option Node.js added here. Under this, you will find a number of project templates to start developing Node.js applications.
If you have TypeScript installed, you will find the same set of templates under TypeScript node as well.
Let us start building a simple Todo list application using NTVS. From the new project dialog, select Blank Express Application, change name of the application to Express-Todo and hit OK.
The new project we just created has all the set up ready for developing a Node – Express application. The project has the following NPM packages installed; you can find them under the npm node in Solution Explorer.
Express is a light weight server framework to develop Node.js applications. Jade is the most popular view engine used with express to compose the pages. Stylus defines a way to write CSS, takes many pain points of writing CSS away.
The app.js file generated with the project template has a number of middle-wares invoked for us to set up the node application.
app.set('port', process.env.PORT || 3000);  //Port number configured for the application
app.set('views', path.join(__dirname, 'views'));  //Folder under which the view files are stored
app.set('view engine', 'jade');  //Configuring view engine so that express parses them before rendering
app.use(express.favicon());  //Invoking favicon on startup
app.use(express.logger('dev'));
app.use(express.json());
app.use(express.urlencoded());
app.use(express.methodOverride());
app.use(app.router);
app.use(require('stylus').middleware(path.join(__dirname, 'public')));  //Stylus middleware invocation
app.use(express.static(path.join(__dirname, 'public')));  //Defining relative path for static files
Now run the application. You should be able to see a simple hello World kind of view in the browser.
We need another NPM package, underscore.js. It can be installed in two ways. One is using the dialog offered by NTVS or using npm command on the command prompt. Let us use the GUI dialog to install the package. Right click on the NPM node and choose “Manage npm Modules…”. Go to the tab “Search npm Repository” and type underscore. Choose the package highlighted in the screenshot and hit Install Locally. This step adds the package to the project and adds an entry of underscore to package.json as well.
Check the contents under npm node, you should be able to see the package underscore there.
Add a new JavaScript file to the folder routes and name it todos.js. This file will contain the API service to display and add todo items against an in-memory collection. Following is the code in the file:
var _ = require('underscore');

var listItems =
[
    {
        "id": 1,
        "text": "Get Up"
    },
    {
        "id": 2,
        "text": "Brush teeth"
    },
    {
        "id": 3,
        "text": "Get Milk"
    },
    {
        "id": 4,
        "text": "Prepare coffee"
    },
    {
        "id": 5,
        "text": "Have a hot cup of coffee"
    }
];

exports.list = function(req, res){
    res.send(listItems);
};

exports.addToList = function (req, res) {
    var maxId = _.max(listItems, function (item) { return item.id });
    console.log(maxId);
    var newTodoItem = { "id": maxId.id + 1, "text": req.body.text };
    listItems.push(newTodoItem);
    res.send({ success: true, item: newTodoItem });
};
I used underscore to calculate the next ID of the todo item. To use underscore, we need to add the require declaration at the beginning of the file, it is similar to the using statements in C# code files. All members to be exposed to the outside world have to be added to the exports object.
In order to expose the above methods as APIs, we need to define the HTTP method and attach a route path to them. In the app.js file add the following statement at the top:
var todos = require('./routes/todos');
This statement brings the module object exposed by the todos.js file. Now all we need to do is define routes, they are done as follows:
app.get('/api/todos', todos.list);
app.post('/api/todos', todos.addToList);
That’s pretty easy, isn’t it? With this, we are done with the work on the server side. Let’s define the components on the client side. As first thing, let’s add jQuery to the layout page. You can install the package using bower and use it or you can point to a CDN as well. Let’s use Google’s CDN path to refer jQuery. Following is the jade tag that does this:
script(src="http://ajax.googleapis.com/ajax/libs/jquery/2.1.0/jquery.min.js")
Now, let’s update the index.jade file to contain the list items. Following is the mark-up of the modified index.jade file:
extends layout

block content
  h1= title
  p Welcome to #{title}
  ul(id="todoList")
  br
  br
  input(type="text" id="txtNewTodo")
  button(id="btnAddTodo") Add New Todo
  script(src="/javascripts/todoOperations.js")
As you see, in jade, one doesn’t require angle brackets to define the tags. It understands nesting through indentation. For indenting the tags, one can use either spaces or tabs; but not both. We are yet to define the todoOperations.js file referred above. Let’s do it now. Add a JavaScript file to the javascripts folder under public folder and name it todoOperations.js. Code in this file is pretty straight forward, if you know jQuery.
var todoOperations = function () {
    var todos;

    function getAllTodos() {
        //var deferred=$.defer();

        return $.get("/api/todos", function (data) {
            todos = data;
        });
    }

    function addTodo(todoItem) {
        return $.post('/api/todos', todoItem);
    }

    return {
        getAllTodos: getAllTodos,
        addTodo: addTodo
    }
}();

var list;

function refreshTodos() {
    todoOperations.getAllTodos().then(function (data) {
        $.each(data, function () {
            list.append("<li data-id='" + this.id + "'>" + this.text + "</li>");
        });
    });
}

$(function () {
    list = $("#todoList");

    $("#btnAddTodo").click(function () {
        var textBox = $("#txtNewTodo");
        if (textBox.val() !== "") {
            todoOperations.addTodo({ "text": textBox.val() }).then(function (data) {
                if (data.success === true) {
                    list.append("<li data-id='" + data.item.id + "'>" + data.item.text + "</li>");
                    textBox.val('');
                }
            });
        }
    });

    refreshTodos();
});
Now run the application. You will be able to see the list of todo items populated on the page and you will also be able to add new todo items.
To update and delete the todo items, you need to define the methods in the todos,js file and add routes for them in the app.js file using app.put and app.delete methods. I am leaving it as an exercise for you :)
Happy coding!
Happy coding!